How to Fix a Water-Damaged Phone – Complete Step-by-Step Guide
Your phone just got wet. The next 60 minutes determine whether this is a minor inconvenience or a permanent hardware problem. Most water damage is reversible when you act correctly and fast — the mistakes happen when people follow outdated advice like the rice method or use heat to speed up drying. This guide covers exactly what to do, in order, from the first 30 seconds through full recovery-How to Fix a Water-Damaged Phone.
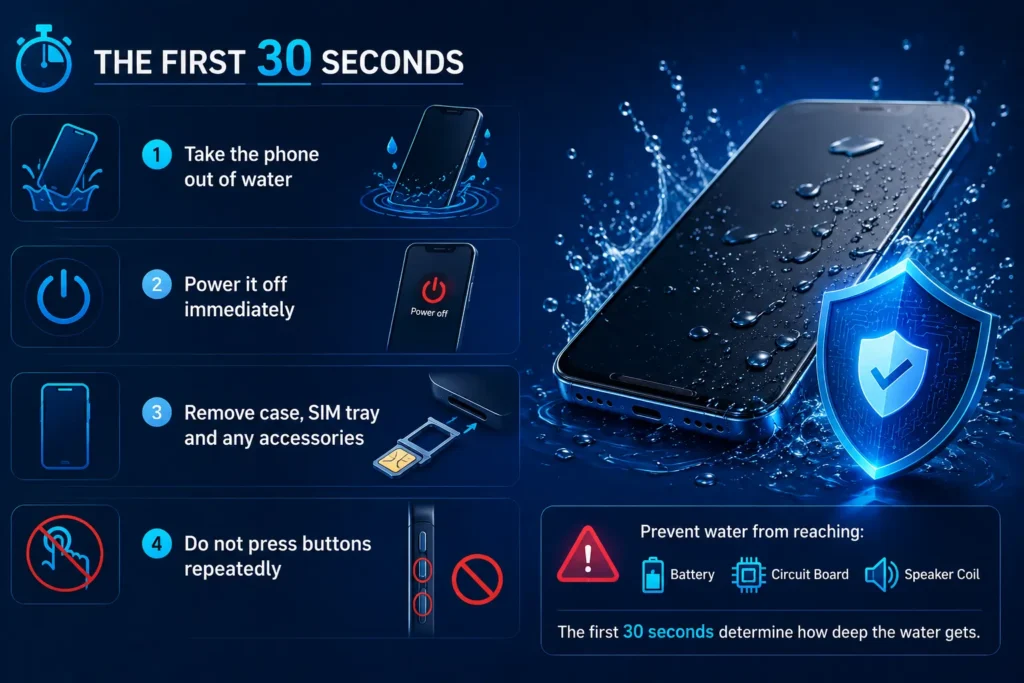
Immediate Actions — The First 30 Seconds–How to Fix a Water-Damaged Phone
Speed matters more than anything else at this stage. Do not pause to Google anything. Do this immediately:
Take the phone out of water. Every additional second of submersion increases water penetration into the speaker chamber, charging port, and SIM tray.
Power it off if it is still on. Water and electricity create short circuits. If the screen is responding, power off immediately. If it has already shut off on its own, do not try to turn it back on.
Remove the case, SIM tray, and any accessories. Cases trap water against the device. The SIM tray slot is a direct water entry point — removing it opens the channel for drainage.
Do not press buttons repeatedly. Every button press on a water-logged phone forces water into the device through port openings and button gaps.
What you are trying to prevent: Water reaching the battery, circuit board, and speaker voice coil. The first 30 seconds determine how deep the water gets.
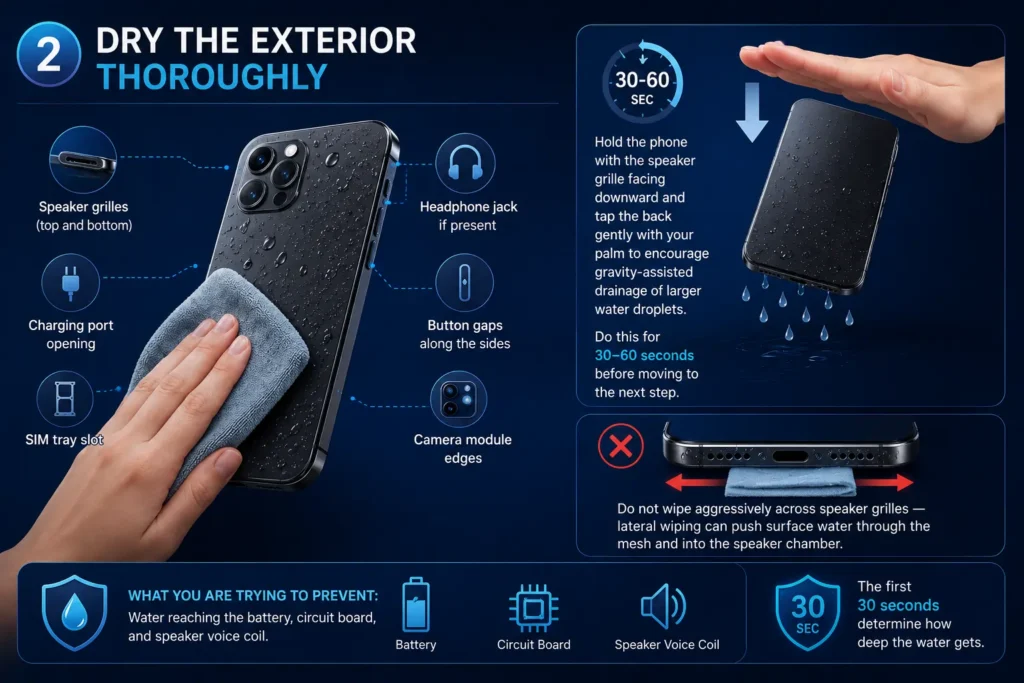
Dry the Exterior Thoroughly
What you are trying to prevent: Water reaching the battery, circuit board, and speaker voice coil. The first 30 seconds determine how deep the water gets.
- Speaker grilles (top and bottom)
- Charging port opening
- SIM tray slot
- Headphone jack if present
- Button gaps along the sides
- Camera module edges
Hold the phone with the speaker grille facing downward and tap the back gently with your palm to encourage gravity-assisted drainage of larger water droplets. Do this for 30–60 seconds before moving to the next step.
Do not wipe aggressively across speaker grilles — lateral wiping can push surface water through the mesh and into the speaker chamber.
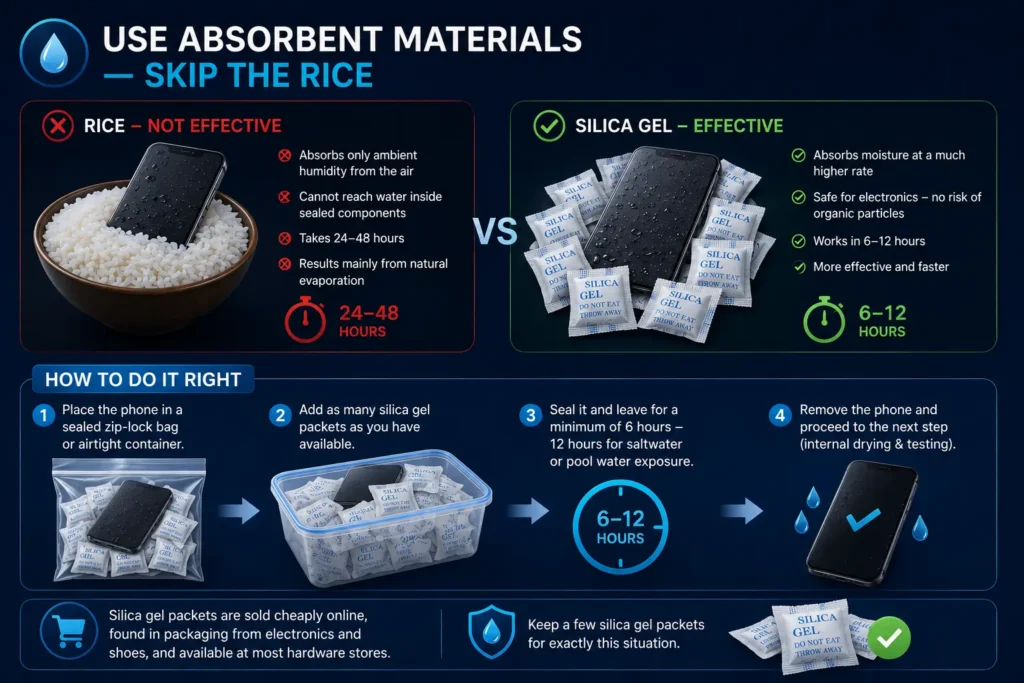
Use Absorbent Materials — Skip the Rice
The rice method is the most widely shared water damage advice on the internet and one of the least effective for smartphones. Rice absorbs ambient humidity from the air around the phone — it cannot reach water inside sealed speaker chambers or adhered to internal components through surface tension. It takes 24–48 hours and produces results primarily from natural evaporation that would have happened anyway.
Use silica gel packets instead. Silica gel absorbs moisture at significantly higher rates than rice, carries no risk of organic particles entering phone openings, and works in 6–12 hours rather than 48.
Place the phone in a sealed zip-lock bag or airtight container with as many silica gel packets as you have available. Seal it and leave for a minimum of 6 hours — 12 hours for saltwater or pool water exposure.
Silica gel packets are sold cheaply online, found in packaging from electronics and shoes, and available at most hardware stores. Keep a few for exactly this situation.
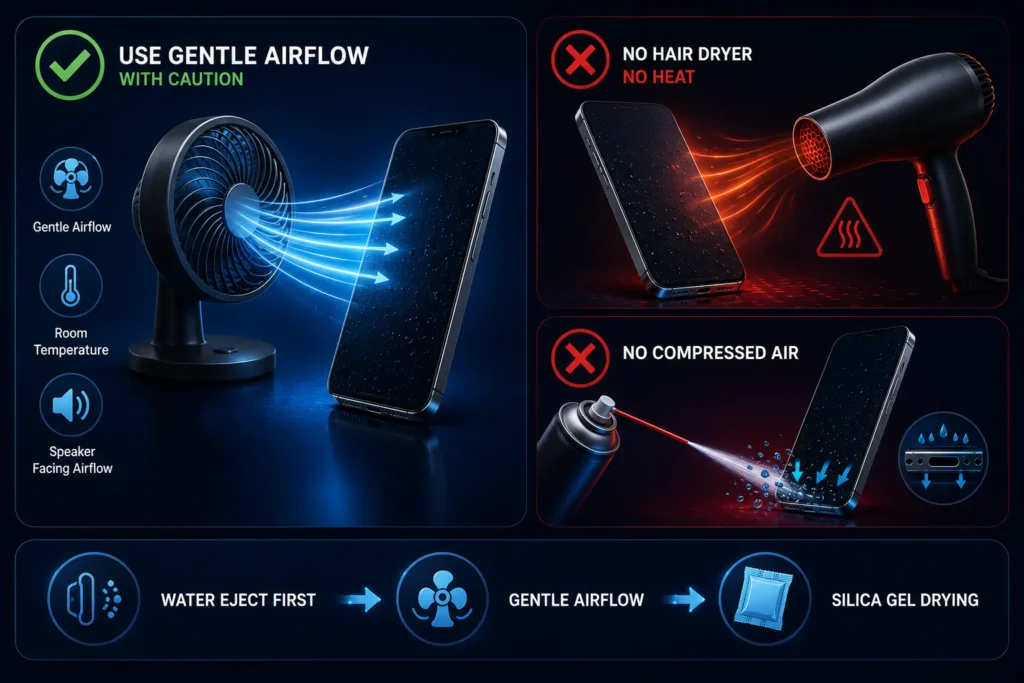
Use Gentle Airflow — With Caution
A fan placed at a distance blowing room-temperature air across the phone can assist passive evaporation after you have completed the acoustic ejection step below. Position the phone with the speaker facing the airflow, not directly into it.
Never use a hairdryer. Even on the cool setting, hairdryers generate heat that warps the speaker diaphragm — a thin polymer membrane with precise tension that deforms permanently at moderate temperatures. A warped diaphragm does not recover regardless of how thoroughly you dry the phone afterward.
Never use compressed air directly into the speaker grille. Compressed air creates inward pressure that pushes surface water droplets through the grille mesh and deeper into the speaker chamber, converting a manageable surface problem into a harder-to-reach internal one this is How to Fix a Water-Damaged Phone.
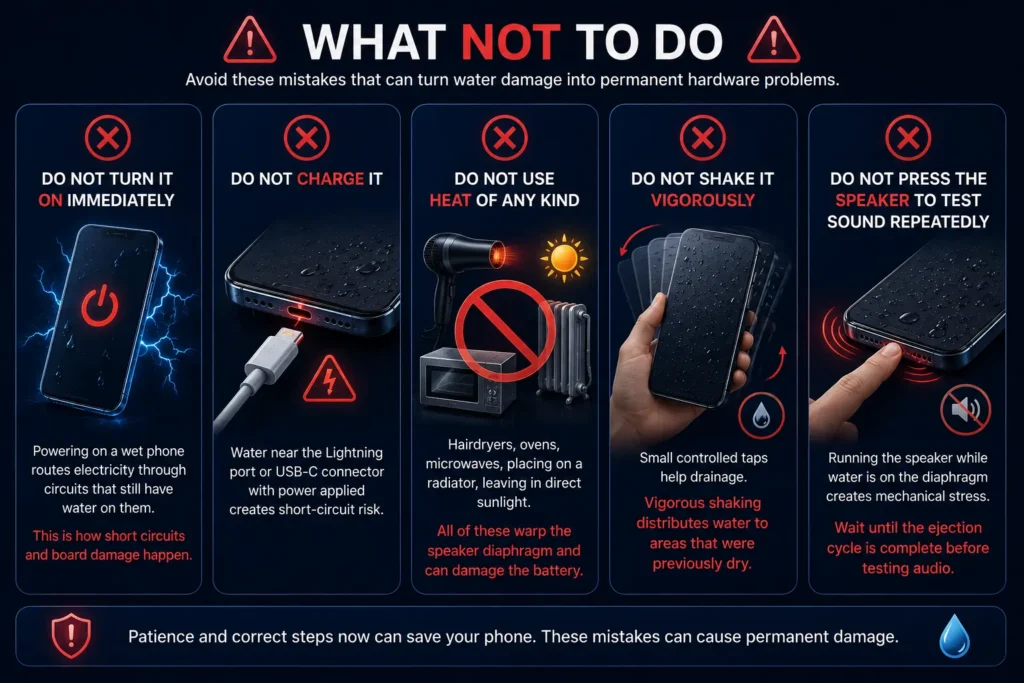
What NOT to Do
These are the mistakes that turn recoverable water damage into permanent hardware problems:
Do not turn it on immediately. Powering on a wet phone routes electricity through circuits that still have water on them. This is how short circuits and board damage happen.
Do not charge it. Same reason — water near the Lightning port or USB-C connector with power applied creates short-circuit risk.
Do not use heat of any kind. Hairdryers, ovens, microwaves, placing on a radiator, leaving in direct sunlight. All of these warp the speaker diaphragm and can damage the battery.
Do not shake it vigorously. Small controlled taps help drainage. Vigorous shaking distributes water to areas that were previously dry.
Do not press the speaker to test sound repeatedly. Running the speaker while water is on the diaphragm creates mechanical stress. Wait until the ejection cycle is complete before testing audio.
Check for Damage Before Powering On–How to Fix a Water-Damaged Phone
Before turning the phone back on, do a visual inspection:
Check the Liquid Contact Indicator. On iPhone, open the SIM tray slot and look for a small white or silver indicator. If it has turned pink or red, liquid reached internal components. This does not mean the phone is beyond saving — but it means proceed carefully.
Check the screen.
Any moisture visible behind the display glass means internal water reached further than expected. Do not power on — seek professional drying first.
Check ports visually. The Lightning or USB-C port should look clean and metallic. Green, white, or corroded-looking contacts inside the port indicate the drying period was not sufficient or corrosion has already started.
If everything looks clean after 6–12 hours of silica gel drying, power on carefully. Do not charge simultaneously with first power-on.
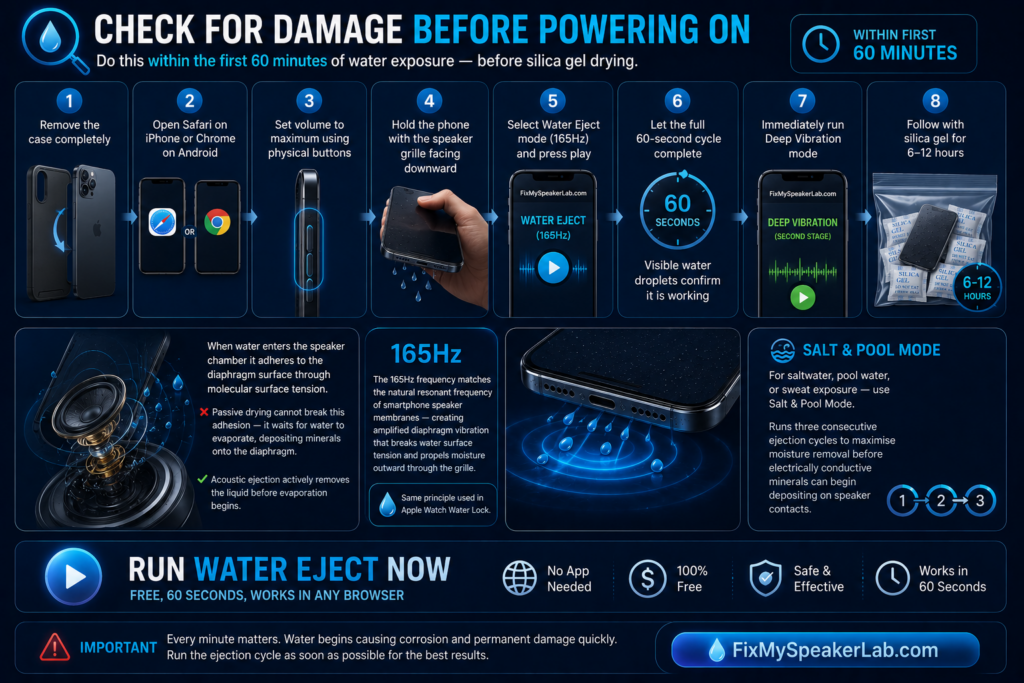
Restore Clear Sound — Eject Water from the Speaker
This step is critical and should be done as early as possible — ideally within the first 60 minutes of water exposure, before silica gel drying, not after.
When water enters the speaker chamber it adheres to the diaphragm surface through molecular surface tension.
Passive drying methods cannot break this adhesion — they wait for the water to evaporate, which deposits dissolved minerals directly onto the diaphragm as it does. Acoustic ejection actively removes the liquid before evaporation begins.
Use the free water eject tool at FixMySpeakerLab.com:
- Remove the case completely
- Open Safari on iPhone or Chrome on Android
- Set volume to maximum using physical buttons
- Hold the phone with the speaker grille facing downward
- Select Water Eject mode (165Hz) and press play
- Let the full 60-second cycle complete — visible water droplets exiting the grille confirm it is working
- Immediately run Deep Vibration mode for the second stage
- Follow with silica gel for 6–12 hours
The 165Hz frequency matches the natural resonant frequency of smartphone speaker membranes — creating amplified diaphragm vibration that breaks water surface tension and propels moisture outward through the grille. This is the same acoustic ejection principle Apple built into Apple Watch Water Lock.
Run Water Eject Now — Free, 60 Seconds, Works in Any Browser
For saltwater, pool water, or sweat exposure — use Salt & Pool Mode which runs three consecutive ejection cycles to maximise moisture removal before electrically conductive minerals can begin depositing on speaker contacts.
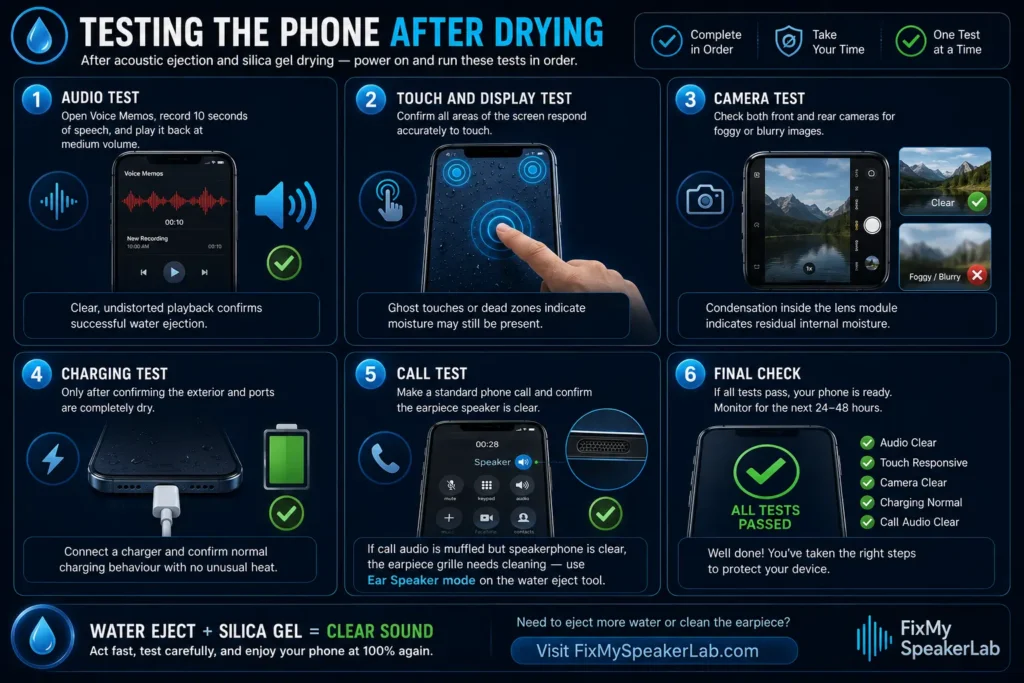
Testing the Phone After Drying
After the acoustic ejection cycle and silica gel drying period, power on and run these tests in order:
Audio test. Open Voice Memos, record 10 seconds of speech, and play it back at medium volume. Voice recording reveals speaker clarity more accurately than music — clear, undistorted playback confirms successful water ejection.
Touch and display test. Confirm all areas of the screen respond accurately to touch. Water on the display temporarily affects capacitive sensitivity — if ghost touches or dead zones persist after drying, moisture may still be present under the glass.
Camera test. Check both front and rear cameras for foggy or blurry images — condensation inside the lens module indicates residual internal moisture.
Charging test. Only after confirming the exterior and ports are completely dry — connect a charger and confirm normal charging behaviour with no unusual heat.
Call test. Make a standard phone call and confirm the earpiece speaker is clear. If call audio is muffled but speakerphone is clear, the earpiece grille specifically needs cleaning — use Ear Speaker mode on the water eject tool-How to Fix a Water-Damaged Phone.
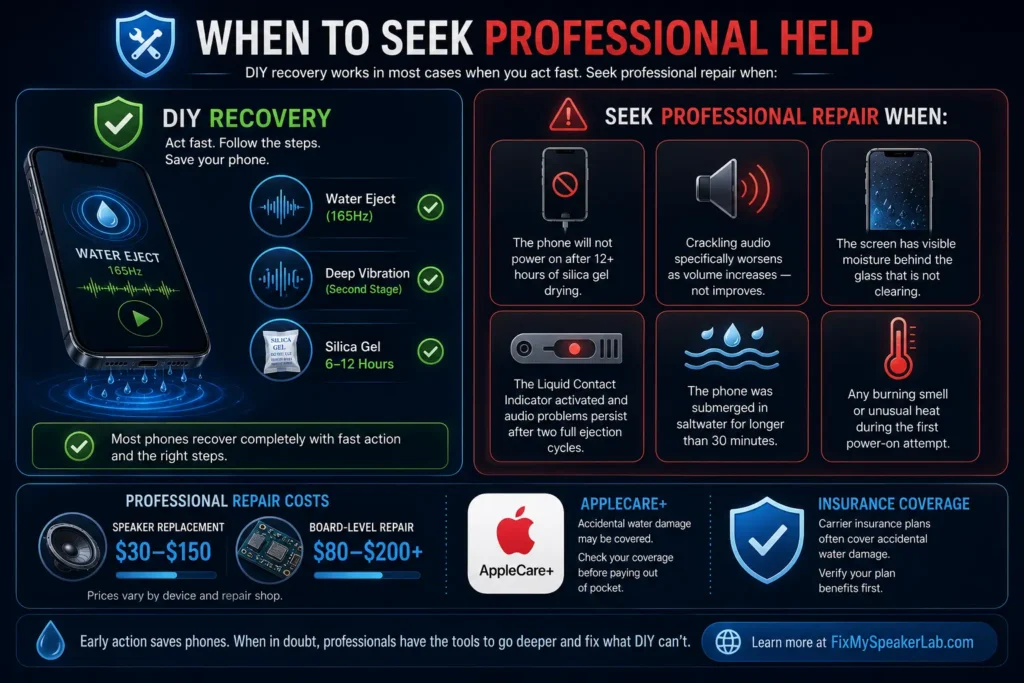
When to Seek Professional Help
DIY recovery handles the majority of water damage cases when acted on quickly. Seek professional repair when:
- The phone will not power on after 12+ hours of silica gel drying
- Crackling audio specifically worsens as volume increases — not improves
- The screen has visible moisture behind the glass that is not clearing
- The Liquid Contact Indicator activated and audio problems persist after two full ejection cycles
- The phone was submerged in saltwater for longer than 30 minutes
- Any burning smell or unusual heat during the first power-on attempt
Professional repair costs vary: speaker replacement runs $30–$150, board-level water damage repair $80–$200+. If the phone is under AppleCare+ or a carrier insurance plan, accidental water damage may be covered — check before paying out of pocket-How to Fix a Water-Damaged Phone.
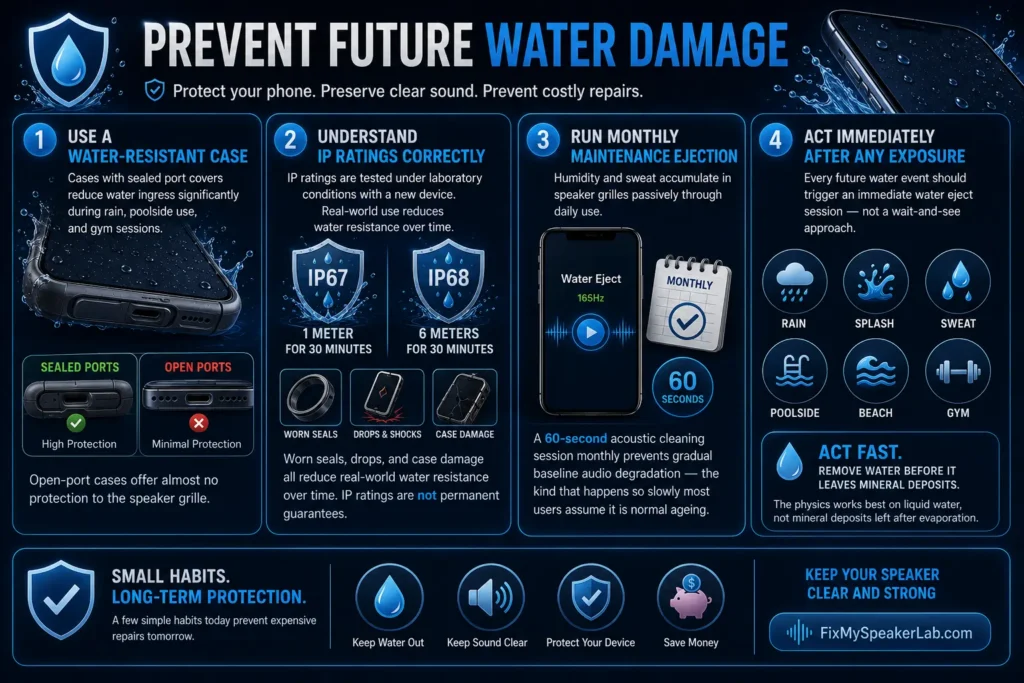
Prevent Future Water Damage
Use a water-resistant case. Cases with sealed port covers reduce water ingress significantly during rain, poolside use, and gym sessions. Open-port cases offer almost no protection to the speaker grille.
Understand IP ratings correctly. IP67 means 1 meter for 30 minutes. IP68 means 6 meters for 30 minutes — under laboratory conditions with a new device. Worn seals, drops, and case damage all reduce real-world water resistance over time. IP ratings are not permanent guarantees.
Run a monthly maintenance ejection cycle. Even without visible water exposure, humidity and sweat accumulate in speaker grilles passively through daily use. A 60-second acoustic cleaning session monthly prevents gradual baseline audio degradation — the kind that happens so slowly most users assume it is normal ageing.
Act immediately after any exposure. Every future water event — rain, splash, sweat, poolside — should trigger an immediate water eject session rather than a wait-and-see approach. The physics works best on liquid water, not mineral deposits left after evaporation – How to Fix a Water-Damaged Phone.
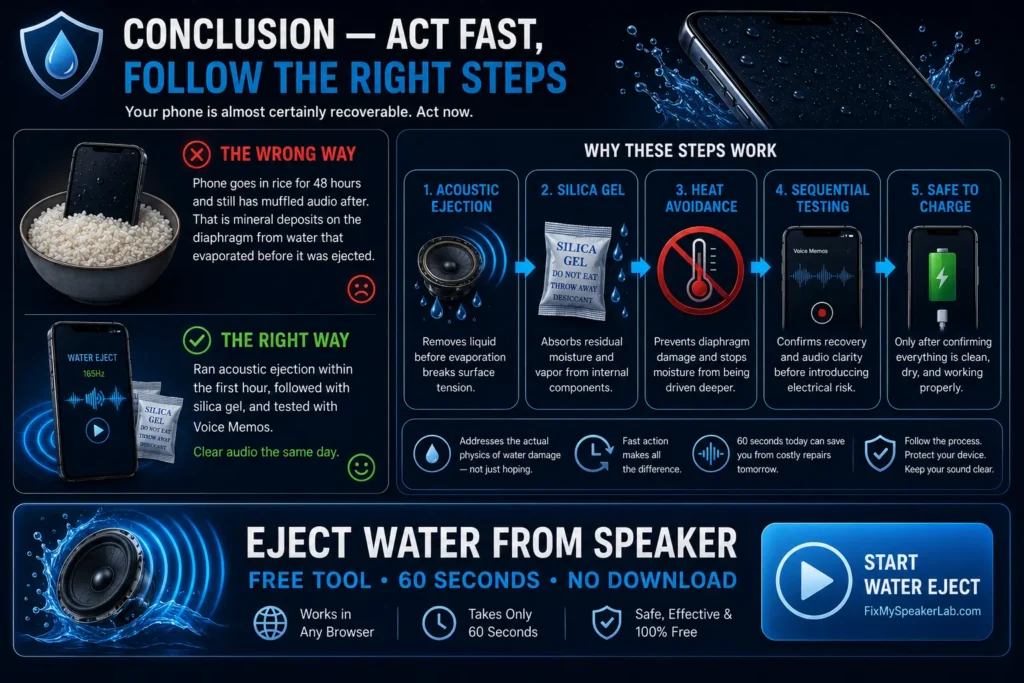
Conclusion — Act Fast, Follow the Right Steps
How to Fix a Water-Damaged Phone–Water damage to a phone is almost always a timing and method problem. The phone that goes in rice for 48 hours and still has muffled audio after — that is mineral deposits on the diaphragm from water that evaporated before it was ejected. The phone whose owner ran acoustic ejection within the first hour, followed with silica gel, and tested with Voice Memos — that one has clear audio the same day.
The steps in this guide work because they address the actual physical mechanism of water damage rather than waiting passively and hoping. Acoustic ejection removes liquid before evaporation. Silica gel handles residual vapour. Heat avoidance protects the diaphragm. Sequential testing confirms recovery before charging reintroduces electrical risk.
Your phone is almost certainly recoverable. Act now.
Eject Water from Speaker — Free Tool, 60 Seconds, No Download
Apple recommends immediate steps after iPhone liquid
exposure to prevent long-term speaker and hardware damage —
detailed on their official iPhone support page-How to Fix a Water-Damaged Phone.