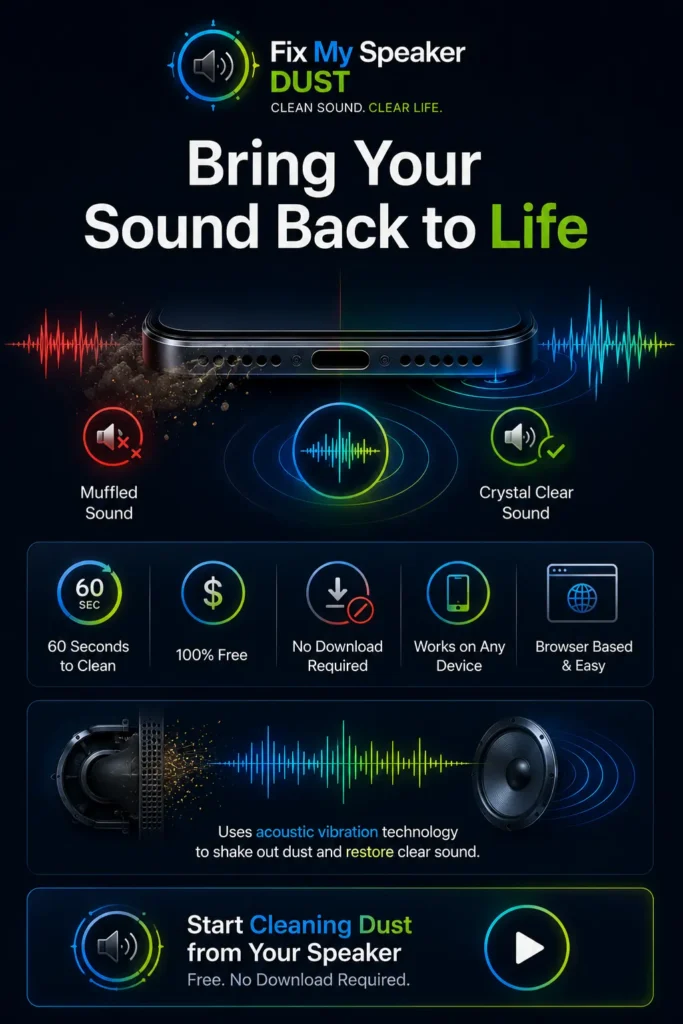
Fix My Speaker Dust – Clear Dust & Get Back Crystal-Clear Sound
Your phone speaker did not go bad overnight. Dust, pocket lint, and fine debris sneak into the speaker grille every single day. By the time sound turns muffled or flat, the blockage inside the speaker mesh is already severe. Fix My Speaker Dust solves this in under 60 seconds using targeted acoustic frequencies — no tools, no disassembly, no risk.
Open the tool, press play, and the precise sound vibration shakes dust particles loose from the speaker diaphragm and pushes them out through the grille. It works on every phone, tablet, and laptop — right inside your browser.
Clean My Speaker Dust Now — Free.
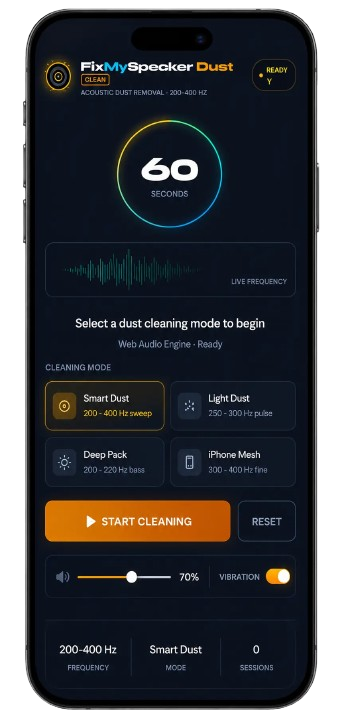
FixMySpeaker DustCLEAN
Acoustic Dust Removal · 200–400 Hz
Dust Removed ✓
Speaker diaphragm clear · Audio restored
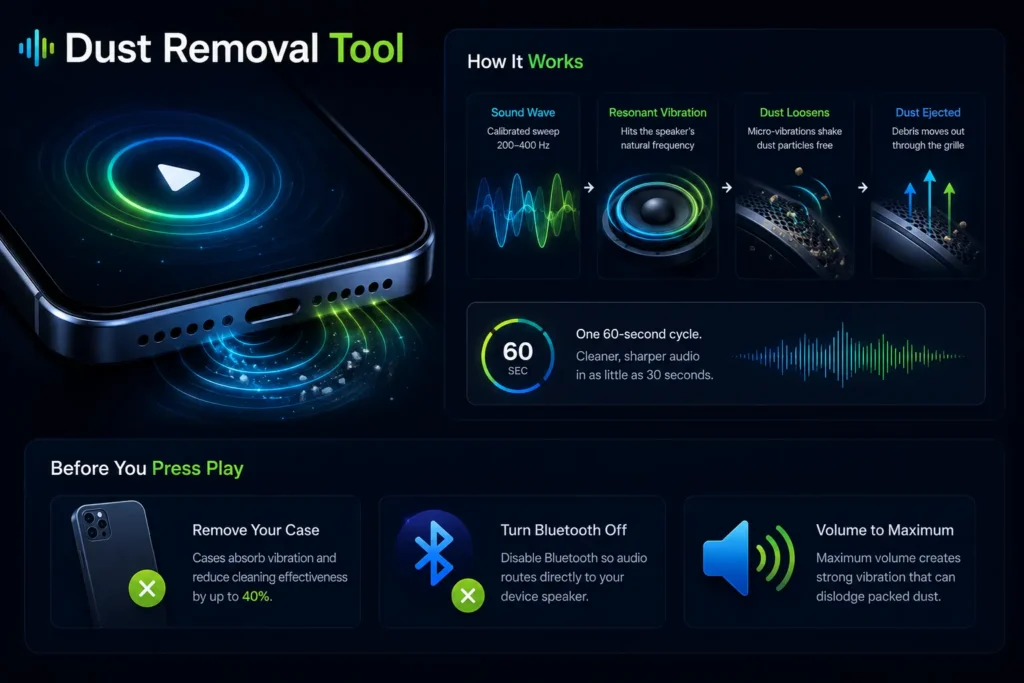
Dust Removal Tool
Fix My Speaker Dust is a free, browser-based acoustic cleaning tool that plays a precisely calibrated frequency sweep between 200Hz and 400Hz. This range sits within the resonant frequency zone of most smartphone speaker membranes. When the tone hits the speaker diaphragm at its natural resonant point, it creates micro-vibrations strong enough to dislodge packed dust particles and fine debris without touching any internal component.
Here is what happens when you press play:
The sound wave enters the speaker chamber and creates acoustic pressure fluctuations against the diaphragm. Those pressure changes force the membrane to vibrate at a frequency that physically shakes dust particles loose from the speaker mesh. The vibration mode then follows — lower-frequency pulses reach deeper into the speaker chamber and push stubborn debris toward the grille opening where it can escape.
Two things separate this from playing loud music on your phone. First, a random high-volume song creates uncontrolled frequency output. Some of that energy vibrates the diaphragm in the wrong direction, which packs dust tighter instead of loosening it. Second, the frequency sweep in this tool cycles through a range specifically chosen for dust particle displacement — not water removal, not entertainment, just targeted debris ejection.
The entire process takes one 60-second cycle. Most users notice cleaner, sharper audio within the first 30 seconds.
Before you press play — do these three things:
– Remove your phone case. Cases absorb vibration and reduce cleaning effectiveness by up to 40 percent.
– Turn Bluetooth off so audio routes directly to the device speaker.
– Set device volume to maximum. Low volume creates weak vibration that cannot dislodge packed dust particles if the issue persists visit our Fix My Speaker Volume page.
Works on Every Device: Phone, Tablet, and Laptop
Fix My Speaker Dust runs in any browser that supports audio output — Chrome, Safari, Firefox, and Edge all work without any setup. The tool needs no app installation, no microphone access, and no account. You open it, press play, and it runs.
It works on:
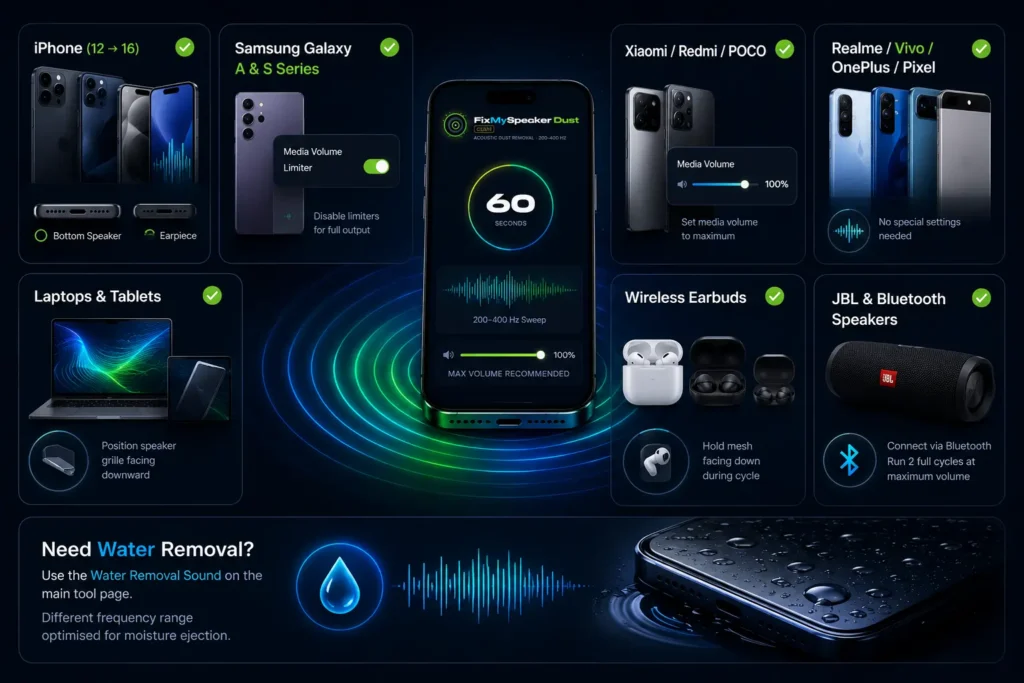
iPhone (12 through 16) — iPhone speaker grilles respond well to the 200–400Hz sweep range. Use Safari for best audio output. No Shortcuts app setup needed — this covers both bottom speaker and earpiece.
Samsung Galaxy (A and S Series) — Disable the Samsung media volume limiter in sound settings before running the tool. This ensures full speaker output during the cleaning cycle.
Xiaomi, Redmi, and POCO — Set media volume to maximum before starting. MIUI volume caps sometimes limit output — check the volume panel to confirm the slider is fully raised.
Realme, Vivo, OnePlus, and Google Pixel — All support the targeted frequency range without any special settings. Run the full cycle twice for older devices with heavy dust buildup.
Laptops and Tablets — The tool works on any device with browser-accessible speakers. For laptops, position the device so the speaker grille faces downward during the cleaning cycle.
AirPods, Galaxy Buds, and Wireless Earbuds — Hold the earbud mesh facing down during the dust removal cycle. The acoustic vibration reaches the mesh without any physical contact.
JBL and Bluetooth Speakers — Connect the Bluetooth speaker to the device running Fix My Speaker Dust and run two full cleaning cycles at maximum volume.
If you also need to remove water from speakers after rain or submersion, use the water removal sound for phone on the main tool page — it uses a different frequency range optimised for moisture ejection.
Why Cleaning Your Speaker Dust Really Matters
Most people wait until sound is noticeably muffled before they clean. By that point, dust buildup has already been restricting diaphragm movement for weeks. Regular dust removal prevents four specific problems that get worse the longer you wait.
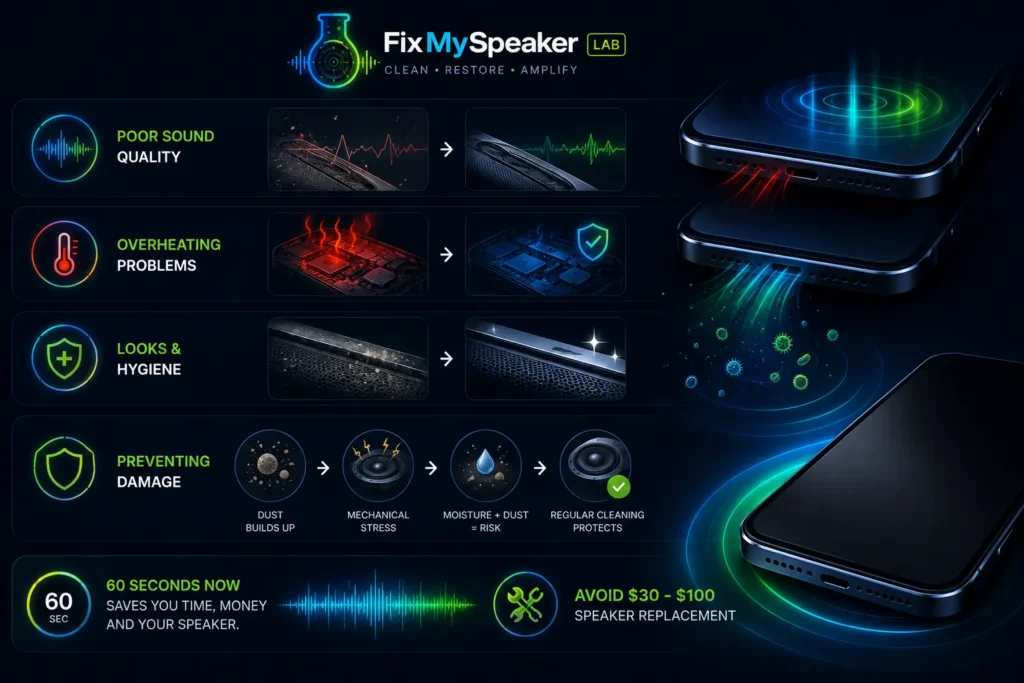

Poor Sound Quality
The speaker diaphragm moves air to create sound. Dust particles packed into the speaker mesh act as a physical barrier that reduces how far the diaphragm can move on each cycle. Bass frequencies disappear first — they require the most membrane movement. Mid-range clarity drops next. By the time treble starts sounding dull, the blockage is serious.
One cleaning cycle with Fix My Speaker Dust restores the full range of diaphragm movement. Users who clean after gradual quality loss typically describe the result as dramatic — not because the tool does anything extraordinary, but because their baseline had dropped so far without them noticing.
Overheating Problems
A blocked speaker grille restricts airflow around the speaker chamber. Phone speakers generate heat during operation, and a dust-blocked grille prevents that heat from dissipating properly. Over time, this raises the operating temperature of the speaker and the surrounding internal components.
Phones that run hot during calls or media playback — without an obvious processing reason — often have blocked speaker grilles contributing to the thermal load. Cleaning the grille restores normal airflow and lowers operating temperature.

Looks and Hygiene
Dust visible in the speaker grille is organic material — skin cells, fabric fibres, environmental particles. In humid environments, that organic debris becomes a surface for bacterial growth. Regular acoustic cleaning removes this buildup without chemicals, liquid, or physical contact with the speaker mesh.

Preventing Damage
Dust itself does not permanently damage speakers — but the long-term consequences of dust buildup do. Restricted diaphragm movement creates mechanical stress on the voice coil suspension. Dust mixed with moisture from humidity or sweat becomes a conductive paste that can bridge electrical contacts inside the speaker chamber.
Cleaning every four to six weeks prevents these secondary damage pathways from developing. Fix my speaker dust removal takes 60 seconds. Speaker replacement takes two hours and costs between $30 and $100.
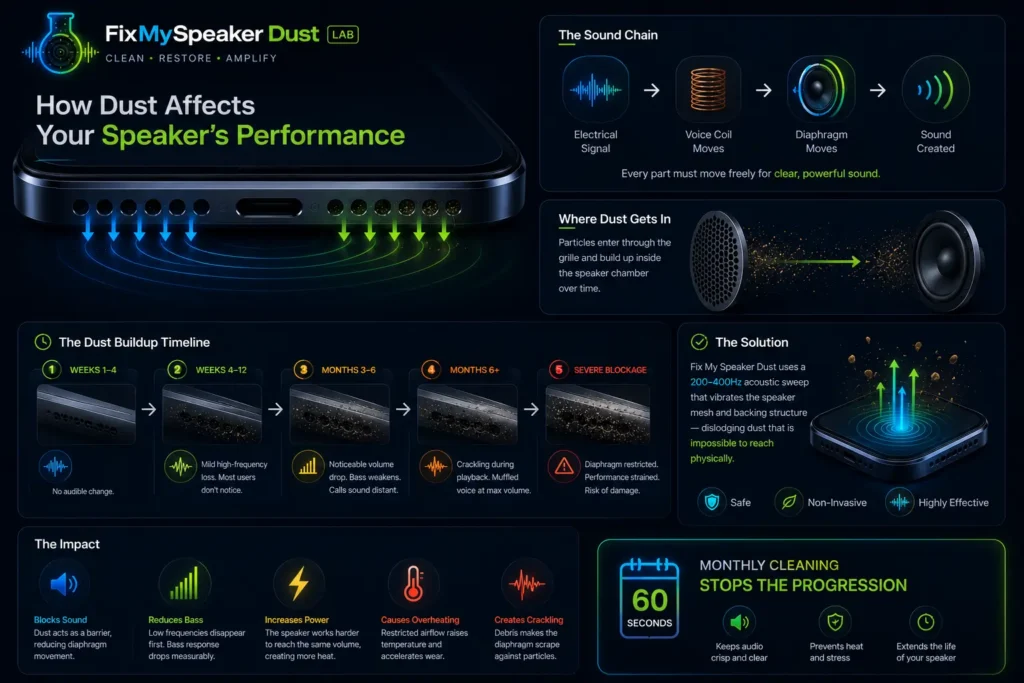
How Dust Affects Your Speaker’s Performance
Understanding why your speaker sounds muffled makes it easier to fix the right problem the right way.
Your phone speaker works through a simple mechanical chain. An electrical signal drives the voice coil, which moves the speaker diaphragm back and forth. That movement displaces air and creates sound. Every part of this chain depends on the diaphragm moving freely.
Dust enters through the speaker grille mesh — the visible holes or fabric covering the speaker opening. Fine particles from pockets and bags pass straight through. Once inside, they settle on the speaker mesh from the inside, on the diaphragm surface, and in the gap between the diaphragm and the speaker housing.
At low levels, dust adds a slight high-frequency dampening — the kind that makes voices sound slightly less sharp but is easy to miss. As buildup increases, the diaphragm starts moving against physical resistance. Bass response drops measurably. The speaker needs more electrical power to reach the same volume — which raises heat output and accelerates component wear.
At severe blockage levels, you hear crackling during playback. That crackling sound is the diaphragm physically scraping against trapped debris on each movement cycle.
How to clean dirt out of iPhone speaker specifically: iPhone speakers have tightly woven speaker mesh that traps fine particles efficiently. The acoustic vibration from Fix My Speaker Dust passes directly through this mesh and vibrates the backing structure — displacing particles that are completely unreachable by any physical cleaning method without disassembly.
Dust buildup follows a consistent pattern:
Weeks 1–4: No audible change. Particles accumulate on grille mesh.
Weeks 4–12:Mild high-frequency loss. Most users do not notice.
Months 3–6: Noticeable volume reduction. Bass weakens. Calls sound slightly distant.
Months 6+: Crackling during playback. Muffled voice at maximum volume. Diaphragm movement restricted.
Monthly cleaning with Fix My Speaker Dust stops the progression at week one and keeps audio quality consistent.
How to Use Fix My Speaker to Clean Dust Instantly
The process takes five steps and under two minutes from start to finish.
Step 1 — Prepare your device
Remove the phone case completely. Phone cases absorb and redirect vibration away from the speaker grille. Turn Bluetooth off — if audio routes to a connected device, the speaker cleaning cycle plays on that device instead of your phone. Disconnect from any charger.
Step 2 — Set volume to maximum
Maximum volume produces the strongest acoustic pressure inside the speaker chamber. At 50 percent volume, the vibration amplitude is too low to dislodge packed dust particles. Android users should check that no media volume limiter is active in sound settings. iPhone users can confirm volume in Control Centre before starting.
Step 3 — Select Dust Removal Mode and press play
Choose the dust cleaning mode. Hold the phone normally — for dust removal, the speaker does not need to face down (that positioning is for water ejection). Watch the speaker grille during playback. With heavy dust buildup, you may see fine particles exit through the grille during the first 15 seconds.
Step 4 — Run the full 60-second cycle without stopping
Stopping the cycle early reduces effectiveness. The frequency sweep covers a range — some frequencies dislodge particles from the mesh surface, higher frequencies reach deeper into the speaker chamber. The full cycle is needed to cover both zones.
Step 5 — Switch to Vibration Mode for stubborn debris
Vibration mode applies lower-frequency pulses that create mechanical force rather than acoustic pressure. This reaches debris that the initial sound wave cycle loosened but did not fully eject. Run vibration mode immediately after the sound wave cycle for a complete two-stage clean.
Test your audio by playing a voice recording at medium volume after both cycles. Clearer, sharper sound confirms the cleaning worked. If audio still sounds muffled after two full cycles, the blockage may be compacted debris requiring physical cleaning — see the manual methods section below.
Press Play and Clean Dust from Your Speaker — Free, 60 Seconds
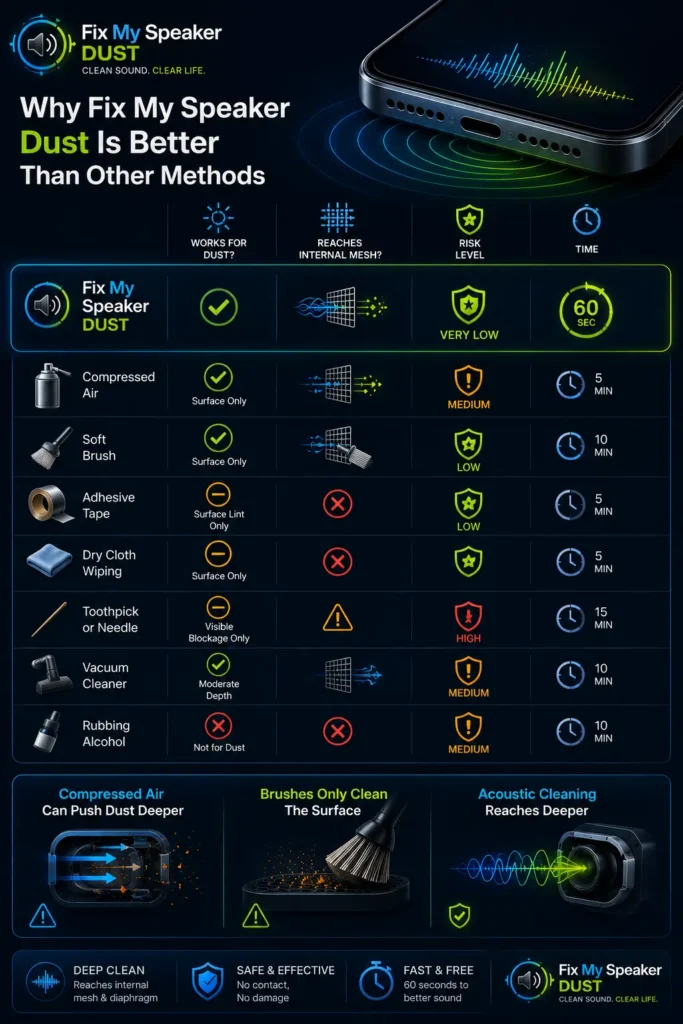
Why Fix My Speaker Dust Is Better Than Other Methods
Every method for cleaning speaker dust has a specific use case and real limitations. Here is an honest comparison so you use the right approach for your situation.
| Method | Works for Dust? | Reaches Internal Mesh? | Risk Level | Time |
| Compressed Air | Yes — surface only | Partially | Medium — can push debris deeper | 5 min |
| Soft Brush | Yes — surface only | External grille only | Low | 10 min |
| Adhesive Tape | Surface lint only | No | Low | 5 min |
| Dry Cloth Wiping | Surface only | No | Low | 5 min |
| Toothpick or Needle | Visible blockage only | Risky | High — mesh damage risk | 15 min |
| Vacuum Cleaner | Yes — moderate depth | Depends on nozzle | Medium — suction risk | 10 min |
| Rubbing Alcohol | Not for dust | No | Medium — moisture risk | 10 min |
Compressed air is the most commonly misused method. The pressure from a compressed air can moves fast enough to push surface dust through the speaker mesh and deeper into the speaker chamber — converting surface-level dust into internal blockage. Fix My Speaker Dust uses acoustic vibration that shakes particles loose and lets them exit naturally through the same grille they entered.
The soft brush approach only reaches particles sitting on the outer grille surface. Any dust that has passed through the mesh and settled on the diaphragm is completely inaccessible to a brush without disassembly.
Acoustic cleaning reaches where no physical tool can — past the mesh, into the speaker chamber, against the diaphragm surface — without contact, without risk, and without cost.
When to Try DIY Speaker Cleaning vs. When to Get Professional Help
Acoustic dust cleaning fixes the majority of muffled speaker problems. But some situations require physical intervention or professional repair. Knowing which category your problem falls into saves time and prevents further damage.
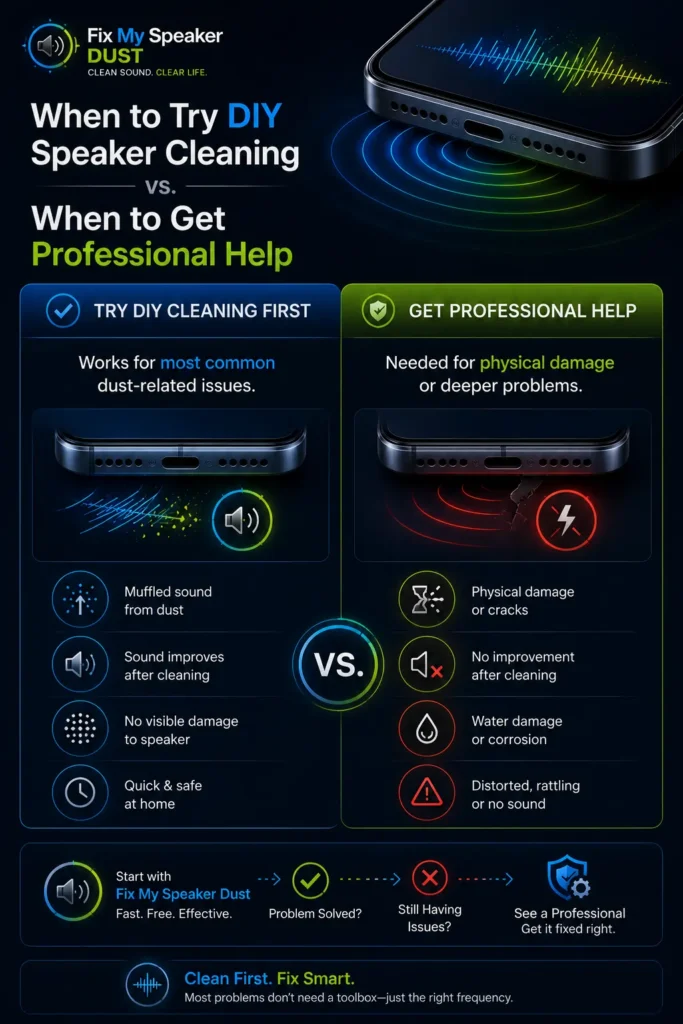
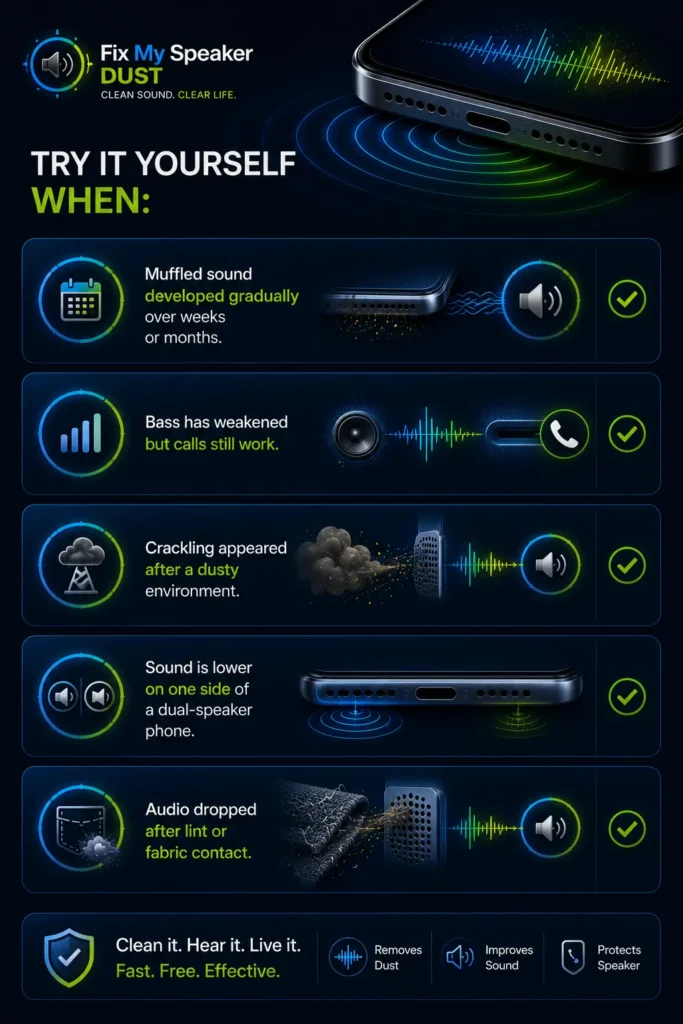
Try It Yourself When:
Muffled sound developed gradually over weeks or months.
Gradual audio degradation is almost always dust buildup. Fix my speaker dust removal resolves this in one or two cycles.
Bass has weakened but calls still work.
This symptom pattern indicates the main speaker grille is partially blocked while the earpiece remains clear. Acoustic cleaning targets exactly this type of blockage.
Crackling appeared after a dusty environment.
A single dusty event — a construction site, a beach, a workshop — can load the speaker mesh in one exposure. Two cleaning cycles typically clear this type of acute blockage.
Sound is lower on one side of a dual-speaker phone. Asymmetric volume between two speakers usually means one grille is more blocked than the other. Run the cleaning tool with each speaker facing downward on separate cycles.
Audio dropped after lint or fabric contact.
Pocket lint and fabric fibres compact into the speaker mesh quickly. Acoustic vibration at 200–400Hz dislodges this type of debris effectively because fibres are lightweight and respond well to frequency cycling.
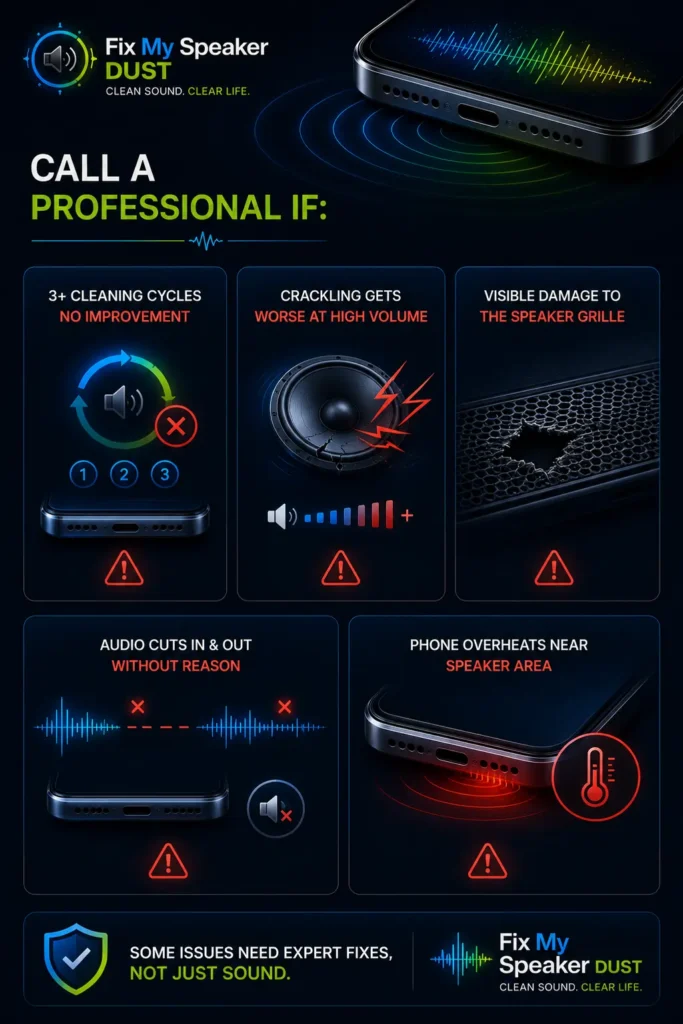
Call a Professional If
Three or more cleaning cycles produce zero improvement.
If acoustic cleaning does not change the audio quality at all after three full cycles at maximum volume, the problem is not dust blockage — it is hardware damage.
Crackling worsens as volume increases.
This specific pattern indicates a torn or physically damaged speaker diaphragm. Sound cleaning cannot repair torn components.
Visible damage to the speaker grille.
Cracked grille fabric, bent mesh, or visible deformation around the speaker opening indicates physical impact damage requiring component replacement.
Audio cuts in and out independently of dust or water exposure.
Intermittent audio failure without a clear blockage cause usually indicates voice coil or connection damage — both require component-level repair.
The phone overheats specifically near the speaker area.
Localised heat near the speaker grille that is not explained by processing load may indicate an electrical fault in the speaker circuit.
Bring Your Sound Back to Life
A muffled phone speaker almost always has one cause — blocked grille mesh restricting diaphragm movement. Fix My Speaker Dust clears that blockage using the same acoustic vibration principle behind precision ultrasonic cleaning equipment used in hospitals and electronics manufacturing. The tool is free, takes 60 seconds, requires no download, and works on any device with a browser and a speaker.
Run one cleaning cycle now. Most users hear the difference within the first 30 seconds. If sound does not improve after two cycles, the hardware diagnosis guide on the main page tells you exactly what to check next.
Explore more speaker cleaning tools for dust, water, muffled audio, crackling sound, and vibration-based fixes — all designed to restore clearer sound in seconds.
Looking for the complete speaker cleaning toolkit? Visit the Fix My Speaker homepage and access all cleaning modes, quick tools, and audio recovery features in one place.to Fix phone mic visit Fix My Mic Speaker
Apple recommends keeping speaker grilles clean to maintain audio quality —
learn more in their official iPhone care guide.
Start Cleaning Dust from Your Speaker — Free, No Download Required