Speaker Cleaner – Clean My Speaker & Get Crystal-Clear Sound Back
Your phone speaker sounds muffled. Volume dropped for no reason. Calls sound distant. None of this is permanent damage — in almost every case it is water, dust, or debris physically blocking the speaker grille. The speaker cleaner tool fixes this using precision acoustic frequencies that vibrate blockages loose and push them out through the grille in under 60 seconds. No app download. No tools. No repair shop. Open it in your browser and press play.
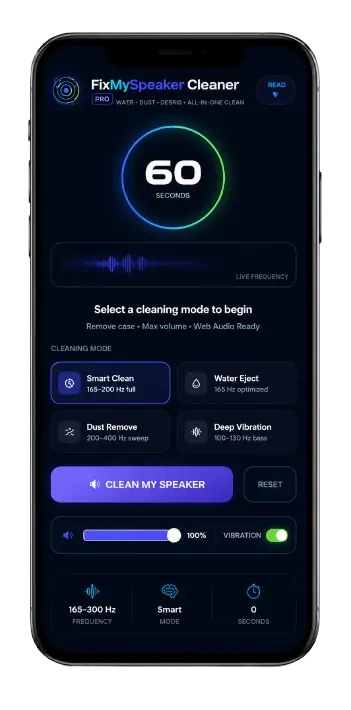
Clean My Speaker Now — Free, 60 Seconds
FixMySpeaker CleanerPRO
Water · Dust · Debris · All-in-One Clean
Speaker Cleaned ✓
Water · Dust · Debris cleared · Audio restored
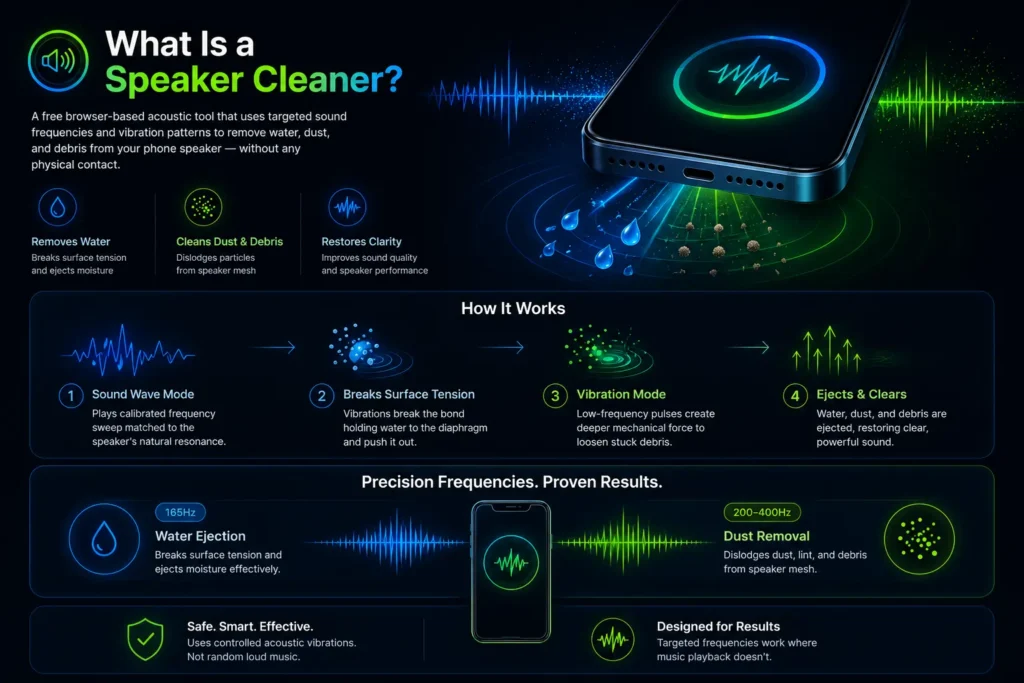
What Is a Speaker Cleaner?
A speaker cleaner is a free browser-based acoustic tool that uses targeted sound frequencies and vibration patterns to remove water droplets, dust particles, and debris from phone speaker grilles without any physical contact. It works by playing a calibrated frequency sweep through your device speaker that matches the natural resonant frequency of the speaker membrane. That frequency match creates controlled vibrations strong enough to break the surface tension holding moisture against the diaphragm and dislodge dry debris packed into the speaker mesh.
The fix my speakers cleaner tool covers both problems in a single session. Sound Wave Mode handles moisture and loosens dry debris. Vibration Mode follows with lower-frequency pulses that create mechanical force reaching deeper into the speaker chamber — ejecting particles the initial sound wave cycle loosened but did not fully clear.
This is not random loud music. Random audio creates uncontrolled turbulence that can push debris deeper into the speaker grill. The speakers cleaner uses specific frequencies matched to each debris type — 165Hz for water ejection, 200–400Hz for dust removal — which is why it works consistently where music playback does not.
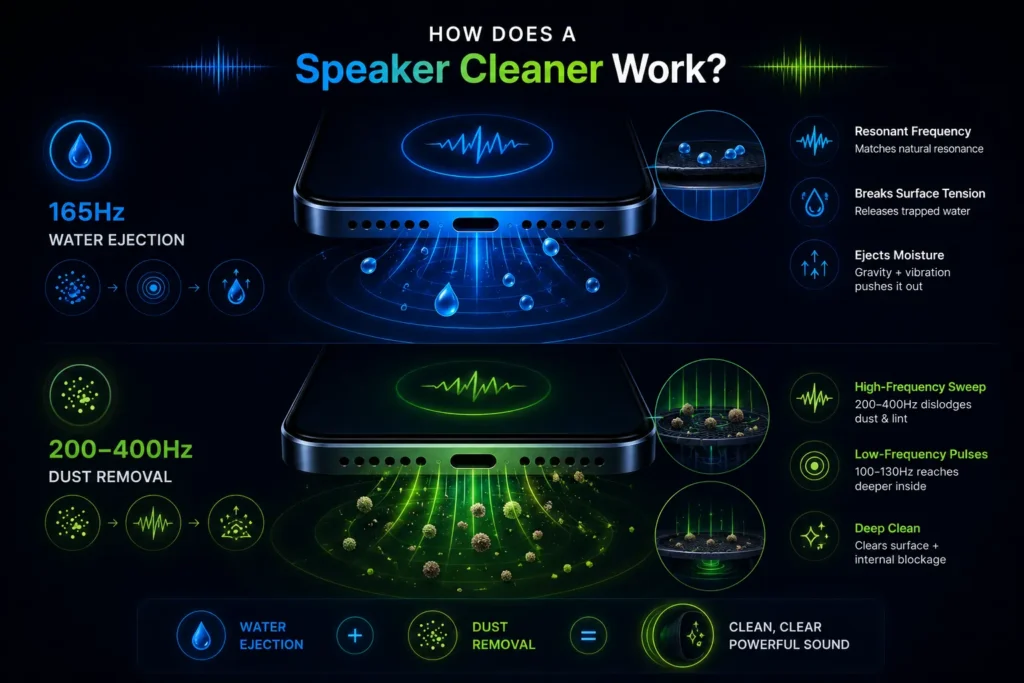
How Does a Speaker Cleaner Work?
Sound Frequencies That Eject Water
Every speaker membrane has a natural resonant frequency — the vibration frequency at which it moves most efficiently. When the speakers cleaner plays a 165Hz tone through the speaker, the diaphragm vibrates with greater amplitude than during normal audio playback. That amplified vibration creates acoustic pressure strong enough to break the molecular surface tension holding water droplets against the diaphragm surface. Once the bond breaks, the water droplet moves toward the speaker grille opening where gravity and continued vibration carry it out.
This is the same acoustic ejection principle built into the Apple Watch Water Lock feature and used in ultrasonic cleaning equipment across hospital and electronics manufacturing environments. The physics is established — the speaker cleaner applies it to smartphones at zero cost.
Vibrations to Dislodge Dust and Debris
Dry dust particles, pocket lint, and fine debris respond to different frequencies than liquid. The speaker cleaner sweeps from 200Hz to 400Hz for dust removal — a higher range that creates the faster vibration cycles needed to physically dislodge particles packed into speaker mesh from the inside.
The vibration mode then adds low-frequency mechanical pulses at 100–130Hz that create force reaching deeper into the speaker chamber, clearing debris that settled beyond the grille surface. Running both modes in sequence produces a complete two-stage clean that addresses both surface and internal blockage.
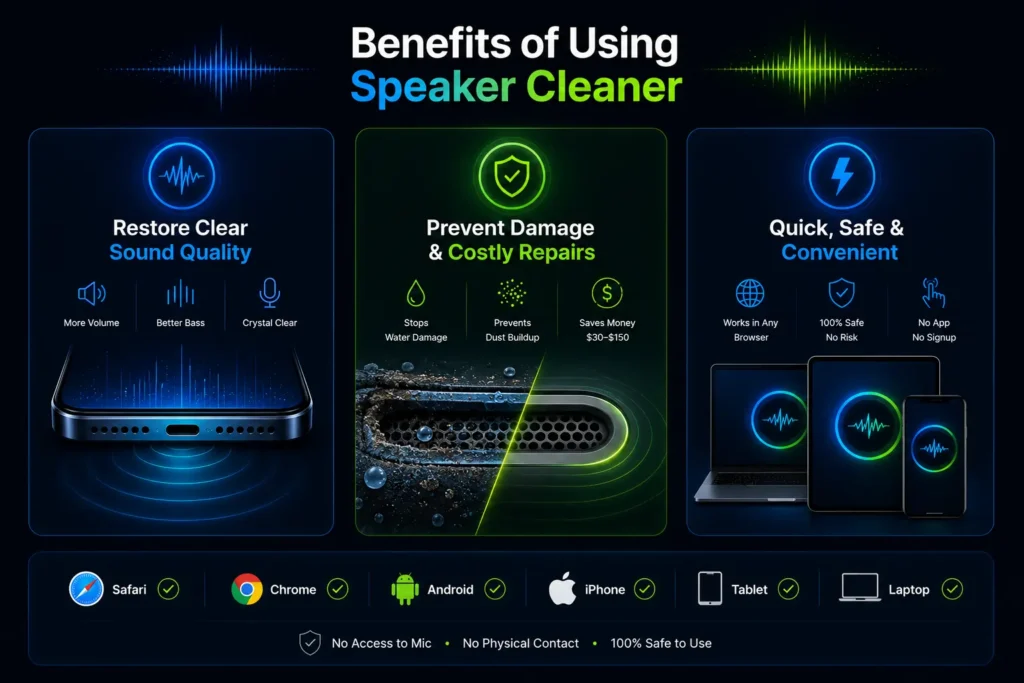
Benefits of Using a Speakers Cleaner
Restore Clear Sound Quality
Removing the physical blockage from the speaker diaphragm immediately restores membrane movement range. Bass response returns, voice clarity improves, and maximum volume reaches its original output level. Most users notice the improvement within the first 30 seconds of a cleaning cycle. Audio quality that felt permanently degraded for months restores to original clarity after a single session.
Prevent Damage and Costly Repairs
Water left inside the speaker chamber corrodes metal contacts and deposits minerals on the diaphragm as it evaporates. Dust accumulation raises operating temperature and increases mechanical stress on the voice coil suspension. Acting within the first hour of water exposure removes moisture before corrosion begins. Monthly dust cleaning prevents accumulation from ever restricting diaphragm movement. Speaker replacement costs between $30 and $150 at a repair shop. The speaker cleaner costs nothing and takes 60 seconds.
Quick, Safe, and Convenient
The tool runs in any browser on any device — iPhone through Safari, Android through Chrome, tablets, laptops. No app installation, no signup, no microphone access, no physical contact with the speaker. The cleaning tone operates within the normal audio output range of smartphone speakers — identical to call audio playback — so it carries no warranty risk and no hardware risk for undamaged devices.
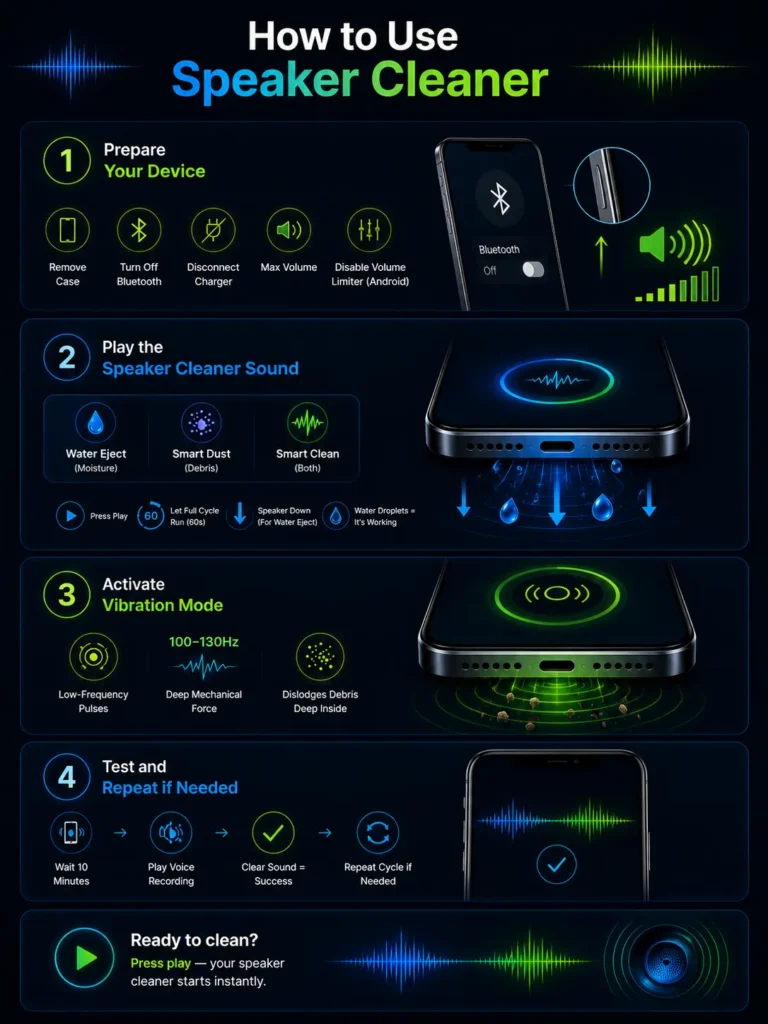
How to Use a Speaker Cleaner
Step 1 — Prepare Your Device
Remove your phone case completely — cases absorb vibration and reduce cleaning effectiveness by up to 40 percent. Turn Bluetooth off so audio routes directly to the device speaker. Disconnect from any charger. Set volume to maximum — lower volume creates insufficient vibration amplitude to dislodge packed debris. On Android, check that no media volume limiter is capping output in sound settings.
Step 2 — Play the Speaker Cleaner Sound
Select the appropriate mode for your problem — Water Eject for moisture, Smart Dust for debris, or Smart Clean for both. For water removal, hold the phone with the speaker grille facing downward so gravity assists the ejection process. Press play and let the full cycle run without interruption. Visible water droplets appearing at the grille during playback confirm the tool is working. Do not stop early — the frequency sweep needs the full 60 seconds to cover all resonant zones of the diaphragm and mesh.
Step 3 — Activate Vibration Mode
Switch to Vibration Mode immediately after the sound wave cycle completes. Low-frequency pulses at 100–130Hz create mechanical force that reaches deeper into the speaker chamber than acoustic pressure alone. This second stage dislodges debris the initial cycle loosened but did not fully eject. Running both modes in sequence is what produces the most complete clean from a single session.
Step 4 — Test and Repeat if Needed
After both modes complete, lay the device flat with the speaker facing sideways and wait 10 minutes. Play a short voice recording at medium volume to test audio clarity. Clearer, fuller sound with restored bass confirms the cleaning worked. If audio still sounds muffled, run a second full two-mode cycle. For moisture problems, follow up with silica gel packets for 6 to 12 hours to absorb any residual internal moisture the acoustic cleaning could not reach.
Ready to clean? Press play — your speakers cleaner starts instantly.
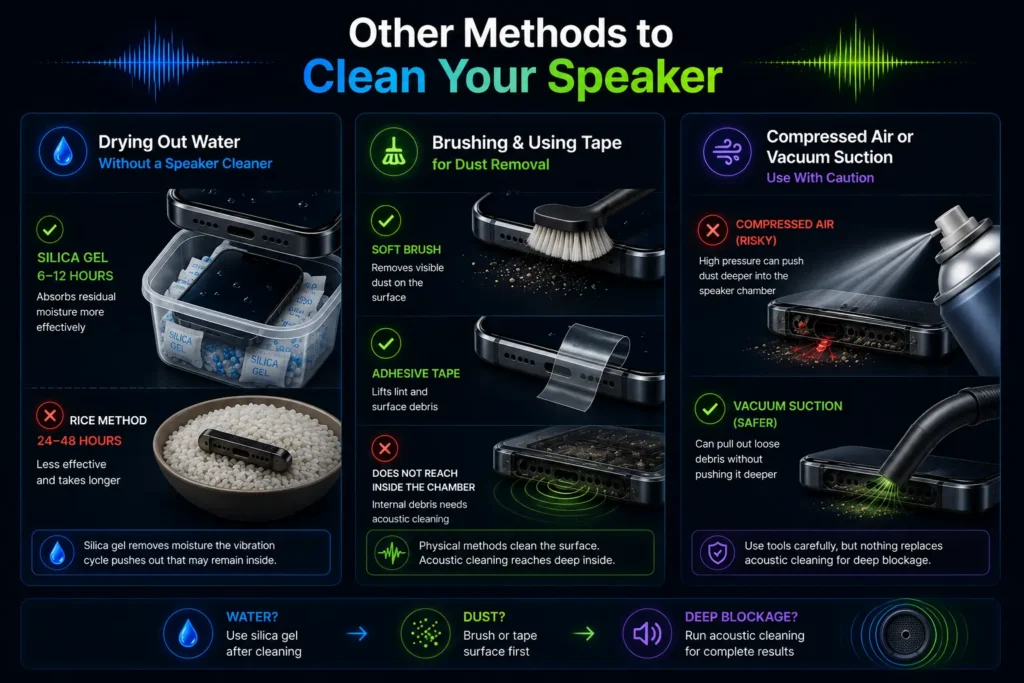
Other Methods to Clean Your Speaker
Drying Out Water Without a Speaker Cleaner
Silica gel packets absorb residual moisture more effectively than any other household method. After running the acoustic cleaning cycle, place the phone in a sealed container with silica gel packets for 6 to 12 hours. This removes moisture the vibration cycle pushed out of the speaker chamber but did not fully eject from the device. The rice method — submerging the phone in uncooked rice — absorbs only ambient humidity and cannot reach water inside sealed speaker chambers. It is significantly less effective than silica gel and takes 24 to 48 hours longer to produce inferior results.
Brushing and Using Tape for Dust Removal
For visible debris on the outer speaker grill surface, a clean dry soft-bristle toothbrush stroked lightly along the mesh direction removes surface particles before running the acoustic cycle. Adhesive tape pressed against the speaker surface and peeled away can remove lint and surface debris — press the sticky side gently against the grille and lift.
Neither method reaches debris that has passed through the mesh into the speaker chamber. The speakers cleaner acoustic cycle handles internal blockage that no physical method can address without disassembly.
Using Compressed Air or Vacuum Suction With Caution
Compressed air removes loose surface dust from speaker grills but creates risks. High-pressure air directed into the speaker opening can push surface particles through the mesh and deeper into the speaker chamber — converting surface blockage into internal blockage.
If using compressed air, hold the can at a distance and use short bursts at an angle. A vacuum with a precision nozzle held at the speaker surface can extract loose debris without the push risk of compressed air. Neither replaces acoustic cleaning for internal blockage.
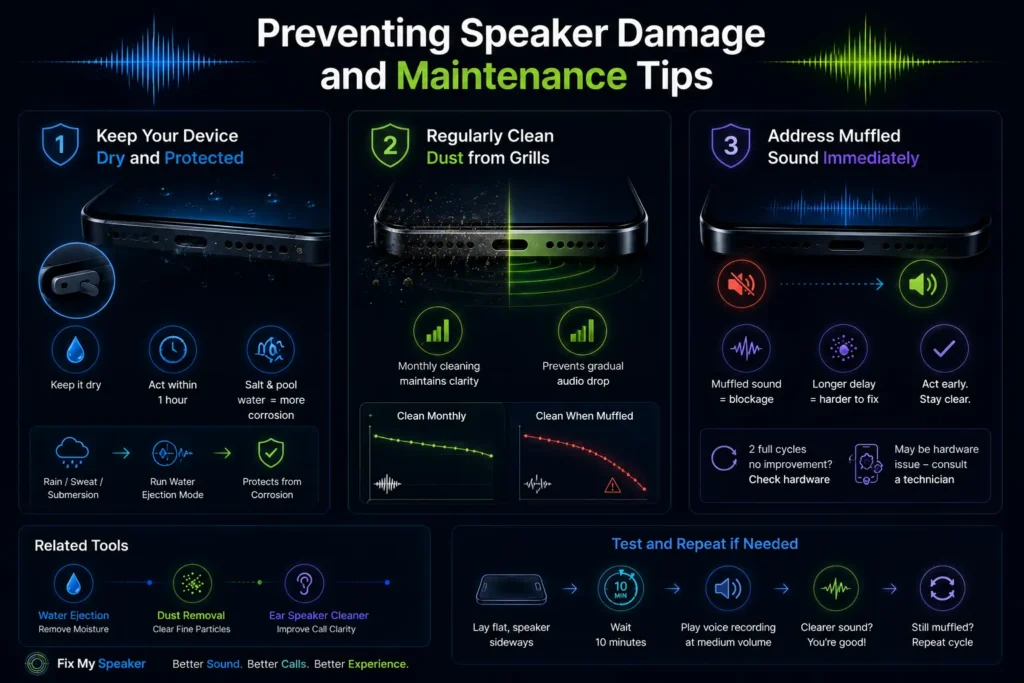
Preventing Speaker Damage and Maintenance Tips
Keep Your Device Dry and Protected
Use a case with sealed bottom port covers in wet environments. After any rain, sweat, pool, or submersion exposure, run the speakers cleaner water ejection mode immediately — within the first hour of exposure produces the best results. Salt water from sweat or ocean exposure is electrically conductive and begins corroding internal contacts faster than freshwater. Act faster with salt and pool water exposure and run additional cleaning cycles.
Regularly Clean Dust from Speaker Grills
Run a dust cleaning cycle monthly as routine maintenance — even when sound quality seems fine. Gradual dust accumulation reduces audio quality incrementally before becoming noticeable. Monthly cleaning prevents the baseline from dropping. Users who clean monthly report minor but consistent audio quality maintenance. Users who wait until audio is noticeably muffled report dramatic improvement — because their baseline had dropped significantly over time without them noticing.
Address Muffled Sound Immediately
Muffled sound is always a signal. It means the speaker diaphragm is restricted — either by moisture, dust, or debris. The longer it continues, the more compact the blockage becomes and the more difficult it is to clear. Running my speaker clean tool at the first sign of muffled audio prevents progressive blockage from becoming severe. If two full cleaning cycles at maximum volume produce zero improvement in audio quality, the issue is hardware damage rather than blockage — a repair technician should inspect the voice coil and diaphragm.
For related tools, visit our water ejection page, dust removal guide, and ear speaker cleaner for specific cleaning modes targeting each problem type.
Sound waves travel through materials by creating alternating
zones of compression and rarefaction — a principle detailed
by the Physics Classroom, a trusted physics education resource.